Showing posts with label yarn. Show all posts

Thursday, July 28, 2016

Natural Dye - Marigolds

I absolutely adore Marigolds!  Lovely flowers that bloom all Summer long + they are excellent at natural dye.

I'm a knitter but not really a sock knitter - preferring other wearable accessories and sweater knitting over socks, but I've always wanted a pair.  I purchased this sock yarn way back in 2008 when I was pregnant with my first child with the hopes of it becoming socks, but never got around to it.  The poor skein has been shoved around in my yarn stash box for years now, since I'm not that impressed with the color it lay neglected.  It is way to blue and I've often wondered why I even bought it in the first place.  It is Lana Grossa Meilenweit - colorway 8007 (blue, tan with a bit of yellow - maybe some grey)


Before!!


I found a bag of Marigolds taking up freezer space and decided to finally use them.  
Frozen since 2013! 


 over 12 oz of flowers for my 4 oz skein is a bit much 
so I raided my closet for something to add to the dye pot.  
I found a 100% cotton summer tank 
that is just a boring white.  
Tossed both in for an alum mordant


Here is the after yarn dyed with Marigolds and a quick half skein dunk in an Iron post mordant

I divided the skein into two equal mini skeins for easy sock knitting.  
Love the green, yellow earthy tones! 
 I cannot wait to cast on


I plan on knitting the Smooth Operator Socks by Susan B. Anderson 
since the pattern is full of tips and tricks for the not so
sock knitter - kind of knitter, like myself!


Thursday, January 22, 2015

Natural Dye Series #5 - Black Beans

 This is probably one of the simplest ways to dye yarn and fabric.   Get a large bag of dried black beans, find a recipe for black bean soup (because you will probably want to eat them after they soak), place the dried beans in a large bowl and cover with water.  Soak overnight.  Add more water if necessary. 

In the Morning, drain the liquid.


The bean are ready to be cooked into that recipe.  May I suggest this one.  Easy and delicious.


Place your yarn into the liquid you drained from the beans.  I used unmordanted unknown wool yarn that I found in my local thrift store on a big giant cone.  It is super rustic and scratchy, but perfect for little dyeing experiments.  I've been making a few different naturally dyed colors and am planning to knit a cowl.


I placed this is a sealed jar and put it in the fridge for about a week.  I stirred and check it every once in a while, but I left it alone.  It got kind of stinky so I'm glad I put it in the fridge.  I was afraid of mold.


Here it is...nice and greyish blue.  The yarn on the left was dyed previously and blogged about here.  I heated the black bean mixture which you shouldn't do unless you want a murky brown.


Here is another go with black beans....

I knit the Meadowsweet Shawl.  Out of JaggerSpun Zephyr Wool-Silk blend in the daffodil colorway.  I'm not much of a yellow type person so I thought I'd try and dye it with black beans.  
Yellow + Blue = Green!


I put the knit shawl in the black bean liquid.


I was a bit concerned during the soaking (which was about 3-4 days at room temp) that the color was a tad bland and not very vibrant, so I pulled the shawl out and stirred a few tablespoons (about 2-3) of baking soda in the liquid.  After this dissolved, I returned the shawl.  It soaked for additional day. 


The after.....


and all three black bean dyed items together for your reference.


Saturday, January 17, 2015

Natural Dye Series, Part 4 -- Black-eyed Susans and Coreopsis Verticillata

No particular reason I grouped Blacked-eyed Susans and Coroepsis together other than I harvested and dyed them on the same day, since they were in full bloom and raging with flowers in Late August.

Black-eyed Susans (Rudbeckia)

I plucked many blooms straight off of the plant and placed them in a jar with some rubbing alcohol to soak.  I placed this in the sun to warm for a few hours.  It really didn't take that long to extract the color.  I also placed two large handfuls into a pot with water and simmered for about an hour.  I added the extracted color from the alcohol to the simmering water mix and cooked a bit longer. 


Freshly plucked pretty little flowers

Into the alcohol


and into the sun


flowers simmering away on the stove


and both solutions...alcohol added to the mix on the stove


and the two strained...look at that dark color!  What color do you think the yarn will be?


Did you guess green?  Here is the pre-modant (alum + CoT) in the pot on a light simmer


Here is the skein after a full soak on the stove and  a rinse


and after a post iron mordant...a wee bit darker


Coreopsis Verticillata

Most people dye with Coreopsis Tinctoria, but that isn't the variety I have in my garden.  I have verticillata which has a pale solid yellow flower with very wispy delicate greeny.  I absolutely love this plant.  Super easy to grow + I've divided my one plant into a few that I've scattered around my perennial beds.  

So I really didn't know what to expect when I harvested this plant in the fall.  So I dyed some yarn on a whim.  My thought was 'well it is still in the Coreopsis family so maybe I'll get some sort of color.'  The Tinctoria variety has a dark orange center to the flower while verticillata is solid yellow so I was thinking I'd get a green or maybe a yellow.

I placed my cut foliage into the pot and simmered for a few hours.   
I got a murky orange!


In went the pre-mordant yarn (alum + CoT).  Soaked and simmered for about an hour.


The skeins out after a rinse


and the before and after on doing a iron post mordant ... everything is a bit darker and more intesne


Here is the before and after on all the skeins


I didn't dye the skein on the far right and I added one at the last minute that didn't make the before shot.  The unknown stash skein on the far left really didn't produce any type of promising results. 


Monday, November 17, 2014

Indie Knit & Spin 2014 -- THANK YOU!!


This past weekend was the Indie Knit & Spin.  It is always such a delight to attend this event.  Thank you so much to all of my friends and family who supported me through this and for all the familiar faces and new friends I met along the way.  It really is so amazing to see the talented fiber friends and their latest creations worn during the day and to see all the amazing products each vendor brings.  I didn't take as many pictures as I expected (I guess I was busy) and look forward to using all of the things I purchased.  I bought a lovely skein of fingering weight yarn from Wren House Yarns.  It is a silk and merino blend.  I cannot wait to cast this on the needles.  I’m thinking something extra squishy with lots of garter stitch.  I also got some fiber to once again figure out how to spin.  I really really want to learn.  I tried for a tiny bit last year, but am determined to give it another go this year.  Maybe the really pretty fluff will keep me inspired.  I got dyed Falkland and Shetland and some undyed Tarhgee.  As the saying goes, watch this space……


Thursday, September 4, 2014

Natural Dye Series - Part 3, Tea & Mint


Tea isn't anything new or different, most people know it dyes with a nice 'antiqued' look.  My husband and I drink a lot of tea so over a few weeks, I collected all of our used tea bags in a large ziploc bag.  I kept this in the fridge since I was afraid of mold.  There was over 50 tea bags ranging from Green Tea to Earl Grey to English Breakfast (all Twinings if you are interested).  

Here is how the dye took on the skein.  Kind of bland and boring if you ask me.


In addition to the yarn I dyed a plain white skirt that has been lurking in my closet for years.


As I mentioned above, I thought everything was bland and boring so I decided to give each a dunk in an Iron Post-Mordant.  My Iron Mordant is some old metal stuff the kids found in the yard while they were digging.  I put this in an old jar with some vinegar and water.  It sat for weeks until it was a murky orangey color.  I added about 1/2 cup of this into some water for the Post-Mordant. 


Each went in for a few minutes....probably 10-20 in total.


I only placed the part of the skein that was originally dyed with tea, not the whole skein.  The remainder of this skein was dyed with some mint (see below).


It darkened the skirt at bit...it is linen.


And the wool a lot.


Next, I put some fresh mint from my garden into the pot for the other half of the skein.


Here is the yarn in the dye pot with the mint tea.


It is a nice golden yellow, but I wondered what it would look like with an Iron Post-Mordant.


So in it went.  I only did half of the half dyed with mint.  I held it in the Iron bath for a few minutes checking it ever once in a while until it was a darker color.


and the final result


and what I've been knitting with the yarn...Splitbark Mitts by Stephen West


Now I figured, since this is technically a soap blog...here are a few snaps of soap where I used mint or tea as a natural dye.


Next up in the Natural Dye Series is Black Eyed Susans and Coreopsis (Verticillata to be specific) and unfortunately (or fortunately depending on your interests) this next series is only involving yarn...no soap. 


Thursday, June 12, 2014

Part 2, Natural Dyeing Series - Marigolds & Calendula

So, sorry to those (few) folks who subscribe to my blog wanting to see/learn about my soap making adventure’s only to be recently mislead into some of my other interests…the most recent being Naturally Dyeing.  In a way it is a related to my soaping since all of my soaps are colored naturally.  I’m an avid knitter so of course my curiosity with natural dyes in soaping would spring up in my love for wool too.  I’m usually thinking,’ what would that look like in soap?’, but now I’m always wondering what wool would look like dyed too.  It is sometimes hard to drive down the road…I’m looking at all the weeds and plants on the roadside and wondering what would they look like in the dye pot.  So onto my little Natural Dye Series, Part 2 – Marigolds and Calendula.

I grouped Marigolds and Calendula together for none other than the latter is referred to as ‘Pot Marigold’.  They look and smell a bit similar too. 

Marigolds are native to North America.  The Aztecs used them in religious ceremonies.  They are used all over the world in festivals and ceremonies for dyes, food and floral arrangements.  They are so easy to grow and once established will flower well into Autumn.  If you save the dead seed pods and dry them you have seeds ready to go next Spring.  I have my kids help plant Marigolds all over the perennial flower beds in our yard for bright touches of color.  I love them and have to admit they are one of my favorites.  I think it is because they are so easy to grow, flower constantly and provide you with seeds for the next year.

Calendula is not botanically related to marigolds, but look similar.  Calendula is native to the Mediterranean area and like Marigolds is used throughout the world for their pretty bright flowers, but Calendulas are also used medicinally to treat wounds and skin irritations.  I started my Calendula plant from a package of seeds that I got at my local farm fleet store.  I harvest the fully matured bright yellow flowers and dry them on an old window screen.  I let a few flowers go to seed and once dried and wilted I dehead and shake the seeds onto the ground.  I tried saving the seeds and planting elsewhere in the garden, but it never took.  I’m on my 3rd season of Calendula from my one packet of seed by doing the above.  I've noticed a few new plants further away from the original so maybe the wind carries some seeds. 

Calendula has many uses, but is mostly used for skin care since it promotes healing and is extremely gentle.  You will find it used in many salves and balms especially for babies chapped or irritated skin.  I use my dried petals in soap since the bright yellow color remains through the saponification process.  I've also infused my oil with dried petals for an extra skin soothing bar of soap.


I only use my dried Calendula petals in soap and salve and Marigolds as natural dyes for animal or plant fibers for sewing or knitting.  Onto some pictures........

Naturally Dyeing with Marigolds:

Cotton Muslin fabric pre-mordant with Alum ready for dye

I used dried Marigold seed pods left over from our Spring planting (approx 4 oz).  The fabric and seed pods are layered into the jar and then I poured hot water over to fill.  This sat on the counter for a few days.


The same cotton muslin out of the dye.

 And the finished product.  I'm impressed with the bright yellow golden color.


I saved the seed pod mixture and decided to try dyeing some yarn with it also.  Here are the natural skeins.  I basically went through my stash and whatever looked natural and plain went into the dye pot.  I did not pre- mordant with anything.  I didn't even scour or pre-soak them.  All are plant or animal fibers (alpaca, merino or cotton)
 

Out of the pot...still a nice golden yellow color with the 2nd exhaust.

I dyed these in the same dye pot...they were a pale natural cotton color before sitting in the dye pot for a few days.  Again no pre-mordant.

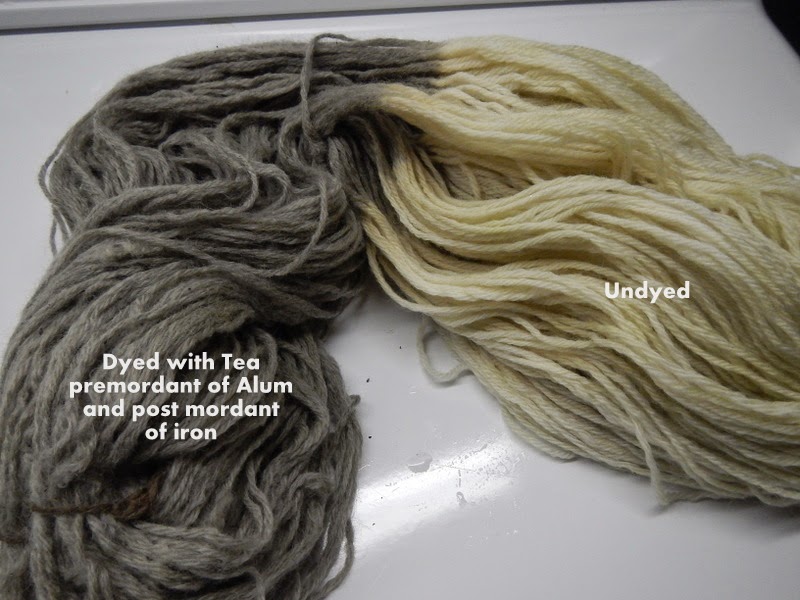
I decided to play around with an Iron post-mordant.  Here is my iron mordant...it is some metal hardware the kids found in the yard digging around that I put in an old pb jar with vinegar and water.  It sat for about 2 weeks until it was all nice and orangy dark.  


 I took a risk and added half of one of the Marigold skeins directly into the iron mordant.  I think next time I would fill a basin with water and add some of the mordant to the water....not the fiber directly in.  It may weaken the fiber...maybe, who knows.  I didn't have a timer but I read you could leave it from anywhere from 5-20 minutes depending on what color you want to achieve.  A post-iron mordant is known to 'sadden' the color...make it darken and more intense.  I had the radio on and left it in for two songs...so about 10 minutes.  


And here it is after a rinse. 

and what I knit with the yarn.....Enchanted Mesa sweater by Stephen West


 Naturally Dyeing with Calendula:


Some dried flower heads


I infused some oil with the dried flowers for a few weeks.  I picked off the yellow petals, placed in a sterile jar and topped with oil.  (I think I used Sunflower Oil, but it may have been Olive).  You can see how brightly colored the oil gets after a few weeks.

 I used that bright oil to superfat a batch of soap and added some petals as decoration to the top. 

Up next in our Natrual Dye series.....TEA!