Showing posts with label dye. Show all posts

Thursday, July 28, 2016

Natural Dye - Marigolds

I absolutely adore Marigolds!  Lovely flowers that bloom all Summer long + they are excellent at natural dye.

I'm a knitter but not really a sock knitter - preferring other wearable accessories and sweater knitting over socks, but I've always wanted a pair.  I purchased this sock yarn way back in 2008 when I was pregnant with my first child with the hopes of it becoming socks, but never got around to it.  The poor skein has been shoved around in my yarn stash box for years now, since I'm not that impressed with the color it lay neglected.  It is way to blue and I've often wondered why I even bought it in the first place.  It is Lana Grossa Meilenweit - colorway 8007 (blue, tan with a bit of yellow - maybe some grey)


Before!!


I found a bag of Marigolds taking up freezer space and decided to finally use them.  
Frozen since 2013! 


 over 12 oz of flowers for my 4 oz skein is a bit much 
so I raided my closet for something to add to the dye pot.  
I found a 100% cotton summer tank 
that is just a boring white.  
Tossed both in for an alum mordant


Here is the after yarn dyed with Marigolds and a quick half skein dunk in an Iron post mordant

I divided the skein into two equal mini skeins for easy sock knitting.  
Love the green, yellow earthy tones! 
 I cannot wait to cast on


I plan on knitting the Smooth Operator Socks by Susan B. Anderson 
since the pattern is full of tips and tricks for the not so
sock knitter - kind of knitter, like myself!


Monday, March 16, 2015

FINISHED that WIP....

Did you look at my last post and wonder what those bundles were around a stick?  
Here's what I made from it..............


I Eco-dyed fabric to make some drawstring bags.  

Just an idea I had to package something new that Dusty Tree Soap will be featuring this Season at our local farmer's market.  
Watch this space......


So how in the world did I do that?

I purchased a yard of plain muslin...washed/dried it and cut 5 stripes using my elaborate template of an old piece of paper.  My template is 7"wide x 291/2" long.


I gathered my supplies.....
some dried herbs/flowers from my garden, steel wool, vinegar & tea 

I enlisted the help of my 3 year old son to help work the magic....he really did all the work, I just directed him.  We make pizzas together so I told him to sprinkle it on like you do the cheese on pizza.  I put the steel wool in a container with some vinegar to soak to start it rusting. 
 (I put this on the fabric...my son did everything else)

After you cover it as much (or as little) as you prefer, top it with another piece of fabric and roll it around a stick.  I secured it with some wire I had on hand.


then steam them for a bit..........


and voila....eco dyed fabric. The fabric panels actually turned out better than I expected.  I thought they would be somewhat pale so I was pleasantly surprised with them.
  I used this tutorial to make my bags.


If you like DTS already on Facebook, 
then you've seen these, but some of my newest soaps for Market.  

The classics........


Thanks for stopping by!


Monday, March 9, 2015

...and now for something completely different


I purchased three skeins of undyed/natural wool to mess around with and to try something completely different for me.  I dyed these with Easter egg dye.  It was a total experiment and turned out pretty cool (if I say so myself and now I can check that off my list of dye techniques to try).

All of the wool was pre-mordant with Alum & CoT  and was still a bit wet. 

For the green/blue: I skeined the wool into a cake and put the blue dye into a bowl then placed the cake of wool in.   It instantly soaked up all of the blue dye so I put a bit more water in and pressed down on the cake to act like a sponge to soak up more.  I let it sit for a few minutes then flipped it over and did the exact same thing with the green dye.  When it was done absorbing as much dye as it could....I should have squished it a bit more to sponge up more of the green as I have some white spots.....I put it in the microwave for a minute 3x...I was afraid of heating the wool too much and doing who knows what to it, so I only did one minute intervals.  

Some in progress pics:

Skeins in cakes & the dye


 the vibrant dye...ready to go


the blue dye


...and the green half


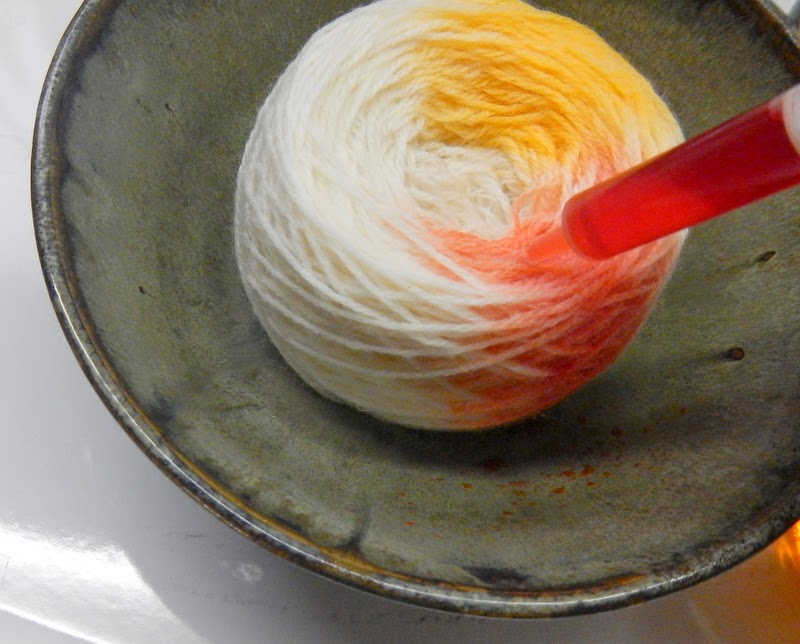
The red/yellow/orange/purple skein was caked and placed in a bowl then I   used a syringe and squeezed red/yellow/orange into segments with the purple being in the middle.  I pushed on the cake like a sponge again to have it absorb as much dye as possible...it also went in to the microwave the same as the other skein.  

In progress pic:  

I didn't take any other shots of this skein being dyed...not sure why?  but as you can see I sectioned each color into segments and sometimes forced the syringe into the caked wool to get the color into the inner layers.  The middle was injected with purple.


...and the last one was on a total whim...I snow dyed this skein.  Yep, SNOW!  I put the skein on a window screen suspended over our basement sink which had a basin in it to catch the draining dye.  Then I went outside and scooped up snow to toss on top on the yarn, which I then poured the dye over this.  Over time the snow melts and the dye runs over the yarn and drips out into the basin....so it can happen slowly then happen fast so the colors are much more muted with a tie-dyed effect.

In progress pics:

The yarn spread out on the screen


the snow dumped over the yarn


the dye poured all over the snow


So from that < to this > was pretty fun and interesting!

Thanks for stopping by!

Wednesday, February 11, 2015

Mint into the Dye Pot

I harvested a bunch ( I mean a bunch!) of spearmint, peppermint and chocolate mint from my garden this past summer and dried it.  I put all of the dried bunches together in a large box.  I didn't keep the varieties separate.  I got tired of moving the box around so I decided to squeeze the dried bunches with my hands to remove the dried leaves.  I filled a large freezer bag with dried mint leaves and still had some left so I pulled out my spice grinder and whizzed a bit to a fine powder to use in my soaps.

I got out my garden shearers and cut the dried stems up a bit and tossed whatever remained in the box + a few handfuls of some dried leaves into my dye pot added some water and let it simmer.


While the mint was simmering, I scoured a skein of Skacel Merino Lace - a discontinued yarn that I found at my LYS.  It was a bare skein of superwash wool.  After scouring it smelled kind of like bleach.


 Not sure if they actually bleached the fibers to get it white or if that stench is from the superwashing process.  From what I understand they coat the wool fibers with plastic so the barbs on each strand will not felt when agitated.....nasty!  I'm not a fan of superwash, but it was at my LYS, bare, within my price range and I had a gift certificate.  

This skein is 100g so that means I needed about 2tsp of Alum and the same of CoT for mordant.

Once the skein was cooled in the mordant bath I added my liquid mint dye.


This simmered for about an hour.  I pulled it out and it was somewhat of a tan bland color so I added 2 tsp of baking soda to the dye bath and mixed it around to dissolve.  This immediately changed the color of the dye to a darker color.  I made sure everything was dissolved and I put the skein back in.  The baking soda changes the ph of the dye - hence changes the color.  I let it simmer for a bit longer, turned off the heat and let it sit overnight.  The result is very pleasing.  


Reading online and in books, I see most people mention that mint dyes a green color so I'm happy with my result.  I'm planning to knit a cropped 3/4 length sleeve cardi with the mint dyed yarn and add a lace button band in grey....should be perfect for Spring.  Love the Grellow color combo.

Thursday, January 22, 2015

Natural Dye Series #5 - Black Beans

 This is probably one of the simplest ways to dye yarn and fabric.   Get a large bag of dried black beans, find a recipe for black bean soup (because you will probably want to eat them after they soak), place the dried beans in a large bowl and cover with water.  Soak overnight.  Add more water if necessary. 

In the Morning, drain the liquid.


The bean are ready to be cooked into that recipe.  May I suggest this one.  Easy and delicious.


Place your yarn into the liquid you drained from the beans.  I used unmordanted unknown wool yarn that I found in my local thrift store on a big giant cone.  It is super rustic and scratchy, but perfect for little dyeing experiments.  I've been making a few different naturally dyed colors and am planning to knit a cowl.


I placed this is a sealed jar and put it in the fridge for about a week.  I stirred and check it every once in a while, but I left it alone.  It got kind of stinky so I'm glad I put it in the fridge.  I was afraid of mold.


Here it is...nice and greyish blue.  The yarn on the left was dyed previously and blogged about here.  I heated the black bean mixture which you shouldn't do unless you want a murky brown.


Here is another go with black beans....

I knit the Meadowsweet Shawl.  Out of JaggerSpun Zephyr Wool-Silk blend in the daffodil colorway.  I'm not much of a yellow type person so I thought I'd try and dye it with black beans.  
Yellow + Blue = Green!


I put the knit shawl in the black bean liquid.


I was a bit concerned during the soaking (which was about 3-4 days at room temp) that the color was a tad bland and not very vibrant, so I pulled the shawl out and stirred a few tablespoons (about 2-3) of baking soda in the liquid.  After this dissolved, I returned the shawl.  It soaked for additional day. 


The after.....


and all three black bean dyed items together for your reference.


Saturday, January 17, 2015

Natural Dye Series, Part 4 -- Black-eyed Susans and Coreopsis Verticillata

No particular reason I grouped Blacked-eyed Susans and Coroepsis together other than I harvested and dyed them on the same day, since they were in full bloom and raging with flowers in Late August.

Black-eyed Susans (Rudbeckia)

I plucked many blooms straight off of the plant and placed them in a jar with some rubbing alcohol to soak.  I placed this in the sun to warm for a few hours.  It really didn't take that long to extract the color.  I also placed two large handfuls into a pot with water and simmered for about an hour.  I added the extracted color from the alcohol to the simmering water mix and cooked a bit longer. 


Freshly plucked pretty little flowers

Into the alcohol


and into the sun


flowers simmering away on the stove


and both solutions...alcohol added to the mix on the stove


and the two strained...look at that dark color!  What color do you think the yarn will be?


Did you guess green?  Here is the pre-modant (alum + CoT) in the pot on a light simmer


Here is the skein after a full soak on the stove and  a rinse


and after a post iron mordant...a wee bit darker


Coreopsis Verticillata

Most people dye with Coreopsis Tinctoria, but that isn't the variety I have in my garden.  I have verticillata which has a pale solid yellow flower with very wispy delicate greeny.  I absolutely love this plant.  Super easy to grow + I've divided my one plant into a few that I've scattered around my perennial beds.  

So I really didn't know what to expect when I harvested this plant in the fall.  So I dyed some yarn on a whim.  My thought was 'well it is still in the Coreopsis family so maybe I'll get some sort of color.'  The Tinctoria variety has a dark orange center to the flower while verticillata is solid yellow so I was thinking I'd get a green or maybe a yellow.

I placed my cut foliage into the pot and simmered for a few hours.   
I got a murky orange!


In went the pre-mordant yarn (alum + CoT).  Soaked and simmered for about an hour.


The skeins out after a rinse


and the before and after on doing a iron post mordant ... everything is a bit darker and more intesne


Here is the before and after on all the skeins


I didn't dye the skein on the far right and I added one at the last minute that didn't make the before shot.  The unknown stash skein on the far left really didn't produce any type of promising results.