Showing posts with label sewing. Show all posts

Monday, March 16, 2015

FINISHED that WIP....

Did you look at my last post and wonder what those bundles were around a stick?  
Here's what I made from it..............


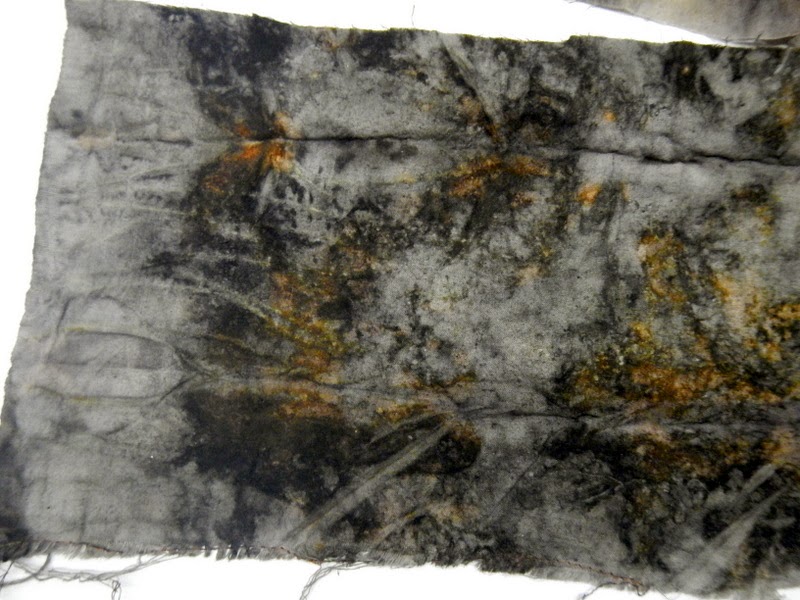
I Eco-dyed fabric to make some drawstring bags.  

Just an idea I had to package something new that Dusty Tree Soap will be featuring this Season at our local farmer's market.  
Watch this space......


So how in the world did I do that?

I purchased a yard of plain muslin...washed/dried it and cut 5 stripes using my elaborate template of an old piece of paper.  My template is 7"wide x 291/2" long.


I gathered my supplies.....
some dried herbs/flowers from my garden, steel wool, vinegar & tea 

I enlisted the help of my 3 year old son to help work the magic....he really did all the work, I just directed him.  We make pizzas together so I told him to sprinkle it on like you do the cheese on pizza.  I put the steel wool in a container with some vinegar to soak to start it rusting. 
 (I put this on the fabric...my son did everything else)

After you cover it as much (or as little) as you prefer, top it with another piece of fabric and roll it around a stick.  I secured it with some wire I had on hand.


then steam them for a bit..........


and voila....eco dyed fabric. The fabric panels actually turned out better than I expected.  I thought they would be somewhat pale so I was pleasantly surprised with them.
  I used this tutorial to make my bags.


If you like DTS already on Facebook, 
then you've seen these, but some of my newest soaps for Market.  

The classics........


Thanks for stopping by!


Friday, March 13, 2015

a work in progress.......

Fabric,
little bits borrowed from Mother Nature,
some steam 
and a little industrial wire


Spring will push through soon


rust & eco dye......


eerie and fantastic.......


simply delightful......


Monday, February 16, 2015

Let's Sew a Tunic - Simplicity #2147, Part 3

The rest of this pattern is pretty straight-forward.  I accomplished it rather quickly after getting the kids to bed.  

We left off needing to seam the sleeves.  Here the directions merely state 'press up sleeve hem.'  I wasn't sure by how much so I folded up 3/8" then folded over another 3/8" for a nice small hem and stitched.

Finished view of top half of tunic.


I'm not adding lace so I moved onto the pleats.  Here I initially marked my pleats on the wrong side of the fabric, but you need to fold and baste them on the RIGHT side of the fabric, so I had to transfer my lines.  

Next, I folded my pleats and pinned.  I shot it briefly with a steam iron and took it to the machine to baste.

Here is a view of how I originally pinned.  Well when I went to baste and had to remove a pin to sew the pleat would move.

You can see the last pleat on the far right...the lines aren't matching up so I ripped out my basting line and pinned a bit differently.


This worked a lot better since the pins were holding the fabric in place, but I didn't have to remove them to sew my basting line.


So the pleats didn't shift and were basted properly.


Moving onto the rest of the pattern I didn't take pictures since it goes rather quickly.  Sew each side of the tunic bottom, attach the tunic top to the bottom.  I had to ease my arms into the bottom a bit to avoid puckers and hemmed the bottom.   I hemmed it with a folded up 2" hem.  I may let this down a bit for a tiny bit longer tunic.  I tried it on and decided it was a bit too baggy & boxy at this point.  When I was pregnant, my maternity clothes weren't even this big so I sewed the side seams of the tunic in a bit...still having lots of ease, but a tiny bit more fitted.  

The finished top!  


Thoughts on the pattern...I think if I were to make this again, (maybe a sleeveless version) I'd use a lighter weight drapier fabric for more movement and flow with the pleats.  Also, I thought it was over-kill (but then again I never made a garment so maybe this is standard), but it states to reinforce the seams at the underarms by stitching over the first set of stitches and then zigzagging back over that.  Are we really that tough on our clothes?  I admit it was late and I was ready to be done with this thing so I only stitched one line of stitches.


Let's Sew a tunic - Simplicity #2147, Part 2

In my earlier post we talked about the pattern, now let's get started with the fun stuff...sewing!

First you need to pull out your pattern and find your pieces.  Follow the diagram for your letter choice -- I'm doing the tunic so I need to cut out C pieces, but I'm doing short sleeves so I'll follow B sleeves.  So I need pieces 1,2, 5 & 6 size 12.  Locate and cut out your pattern pieces.  If you see the triangle on the line cut a triangle to mirror.


Lay all of your pattern pieces out on your prepped fabric.  Follow the layout diagram in your directions.  You will pin these to the WRONG side of the fabric, match the pattern to the fold where indicated.  Some of the pattern pieces are laid out right side some are wrong side.  There is a guide in the directions to follow if your pieces are shaded. 


Next grab your fabric shears and cut out the fabric pieces.  Remember to cut your notches.  These are areas in the pattern that you need to align .

Once everything is cut out, you need to see if there are any special markings you need to transfer to your cut fabric pieces.  In this case it is the pleats.  The easiest way I found to transfer these markings to my fabric was to use pins.  Place a pin at the beginning and the ending of the line......


then fold the fabric back and mark where this pin is.  Use you pencil to draw a line connecting these dots.  Continue and mark all of the pleats on each side of your fabric.


I guess you will need these lines to sew your pleats...we will find out later in the pattern.


Next, the directions tell you to sew stay stitching.  This had me stumped...I had to turn to Google to read about it.   Basically, it is a sewn line that holds the neckline in shape so it doesn't stretch out when sewing your neck band.  Sew this 1/4" from the edge on the right side


Next, join shoulder and underarm seams, wrong sides together and match up your notches.  The pattern mentions to finish the edges.  I used a short zigzag stitch and sewed both together and pressed my seams to one side.


Next comes the neckline. This section was a total mystery to me when I initially read through the pattern.   Take your time here and read through the directions slowly you will see that it all comes together if your take it one step at a time.  

Take your bias tape, open one end up and iron it flat...be gentle you still want that crease line.  This is what you will eventually use as a guide when sewing.  Fold back the end of the tape 1/2" and start on one shoulder and pin to your neckline.  Now if you were really good when sewing your stay stitches at 1/4" from the edge, you will notice that the edge of the bias tape butts up against this line since you are to sew it in with a 3/8" seam.  Ease the tape around the neckline, pinning into place on the right side of your fabric with the raw edge toward the edge of your fabric.  


Take to your machine and sew in the crease on the tape. 


Fold the bias tape up and over to the wrong side of the fabric and iron in place.  Now the directions here tell you to hand baste in place. 


 Instead, I set my machine to a long stitch length and stitched along the edge of the bias tape on the wrong side.


  Turn your piece to the right side, set your machine stitch length back to 'normal' and sew right next to that line on the inside toward the edge of the fabric.  Grab your seam ripper and simply rip out the baste line.  Stand back and admire your work!  Yes, pat yourself on the back...I did! 


Up next, continuing on the pattern.  Soon we will have amazing FO's to wear and learned a bunch of new skills along the way.


Sunday, February 15, 2015

Let's Sew a Tunic -- Simplicity #2147

Looking forward to  Spring, I thought I'd try something new and sew clothing.  I usually only sew bags and accessories so I have some experience, but nothing when it comes to reading an actual garment pattern.  I thought it would be fun to put together a series of blog posts so if anyone else out there would like to learn, maybe my posts would help.  

I found this cute tunic pattern (it really is...the packaging leaves much to be desired, but I saw some really nice versions on Pinterest) and hopefully it is as easy as the envelope leads me to believe.  I also found some bright and cheery fabric in the bargain section of my local big box store.  It is a step put of my comfort zone color/print fabric, but I think it will work nicely with this pattern.


As you can see on the front of the envelope there are a few different variations included with this pattern and the sizes range from 6-18.  You get all sizes in this one pattern.  I am going to make myself the tunic (C) with short sleeves.  I am tall so I may extend the length of my tunic pieces to work for me.  

So, the front of the envelope lists some new skills that we will learn: pleats, stitch a yoke and apply neck facing are new to me!

If you turn the package over all the necessary details are provided so you know what items you need to purchase.  This really intimated me at first, I stared at it not knowing what I was really looking at until I calmly looked at each section, it started to make a bit more sense.  

If you look at the top box it lists what type of fabric will work nicely with the ease and style of this pattern.  I choose a cotton.   The next box lists all of the notions you will need with each pattern type (A, B, C).  I doing C so I need thread and 1/2" wide single fold bias tape (this is something new to me so I get to learn a new skill).

The next box is body measurements.  I think this is where we fail and don't properly take the time to measure ourselves or just assume and go with our bra size.  Take your time here and grab your measuring tape and do it.  The pattern sizes are different than our clothing sizes.  I usually wear a size 6, but with this pattern I'll be making myself a size 12 tunic.  when I measured I looked up, not down at the measuring tape.  You don't want your body hunched over -- this may distort things.  I used my hands to feel the tape where it ended, then looked down at the number.  As you can see from my written measurements, I fall between a few sizes.  For this pattern I'm not too worried about it, since it is an unfitted baggy tunic.....I'm going with my closest bust measurement which is 34 or pattern size 12.


Follow the chart to purchase enough yards of fabric for your size.  Fabric comes in different widths, but for this pattern it doesn't matter.  Other patterns may separate the 45" and 60" yardage requirements.

When you get your fabric home, you will want to pre-treat it (wash it) so it is all ready for pattern layout and cutting.

That's it for today...next up is opening the envelope to find directions and the actual tissue paper pattern, pattern layout, cutting, etc.  

Monday, February 2, 2015

Use it or lose it! -- How to mend your jeans

I'm pretty tough on my jeans.  I play with the boys a lot on the floor and my favorite jeans  have got to be years old.  You know the kind -- the ones that are your favorites and you cannot be without. When your having a bad day, feeling blue you put on your favorite jeans and forget about your worries.  Well, I wish it was that easy, but you know what I mean...so when you get a hole in the knee it is pretty sad.  I searched online and found a tutorial on how to mend hand-knit socks so I used the same method on my jeans.  Here are the steps to what I did and they turned out great. 


I used embroidery floss in a similar color and a sturdy needle.  I inserted a jar lid into the jeans to make it easy to hold the fabric and so I wouldn't catch any of the leg fabric.  This made it a lot easier.  For people who darn socks there are darning eggs.

  You basically are weaving a new layer a fabric over your hole and attaching it on all sides.  You may have heard the about warp and weft before.  They are the terms to explain the rows of thread you will be creating in your new fabric patch.  The warp is the lengthwise thread that lays the foundation that you will weave your weft through.  Below is a picture of me sewing the warp over the hole in the knee of my jeans.  I inserted the needle from back to front - I did tie a knot to hold the thread so I could get a firm foundation.  You insert the needle back down into the fabric front to back near your hole (pick a spot where the jean fabric is still firm enough and not frayed.)  Repeat this process until you have the warp thread over the entire surface.

Next comes the actual weaving in and out of the weft thread (I turned my work to make it easier to weave)  You go over, under, over, under the warps and at the end pick up a bit of the jean material to catch your work.  Below is a close-up.


I wove my weft over, under the warps and am securing the end of my work before pulling the thread through to weave another row.


Row two compete, secure the end of the row by picking up a bit of the jeans before working next row.   Make sure each row is opposite in the over, under of the weft through the warp.


You repeat in this manner until you reach the end of your warp patch.


Make sure your rows are snug.  This is a front side of my work.  I'm finished with my patch.  I inserted my needle from front to back and repeated the whole process for a double sided patch.  It is jeans...I'm tough on them....I thought I'd need double support on the patch.


Here is my patch inside-out and my thread ready to weave the weft into the warps.  


My finished patch after repeating the process on the back side.


and my two pairs of jeans newly mended.


Sunday, September 23, 2012

I do other things beside soap

I'm working on a sewing project (or two or three...) these past few days.  It is surprisingly going really fast!  I'm amazed.  I got a new walking foot for my Kenmore machine and I'm in LOVE!  It makes everything just perfect...like butter.  My seams are perfectly aligned...I'm amazed.  Who know sewing could be so much fun, but I wonder why my machine needs to have the walking foot just to function properly.  Who cares, just as long as it works better now.  I used to get so frustrated and constantly thought what am I doing wrong...I'm just not a sewer, I'll stick to knitting.  But wow, I'm in love....here is a snippet of what I'm working on....ssshhhh!  It is a secret present for a friend.