Showing posts with label wool. Show all posts

Friday, April 8, 2016

So many new stuff & things.....


Wednesday, September 23, 2015

new design in the works....

Something new I'm working on -
aptly named Summer's End Mitts
as today marks the First day of Autumn 2015
what a favorite of mine -
the mitts and the season! 


these are knit using some reclaimed wool -
which is absolutely wonderful stuff -
I wish I knew what it was - it is the real deal
a bit scratchy + love the feel of the lanolin!
They may just be dunked in the 
dye bath once complete.

Monday, September 21, 2015

Now that's a different way to recycle!

I've been known to purchase (ok, hoard) wool and wool blend sweaters from my local thrift store to take them apart and reclaim the yarn.  Yes, it is time consuming, but the more I do it - the better + faster I am at ripping them out.  


I'm in the process of ripping this Express turtleneck cabled beauty out, when it hit me - I should totally make a hat out of that turtleneck part.  I even surprise myself sometimes with ingenious ideas.  It is a bit tight on my head, but fits my son (who is 4) perfectly.  So, I'll ripped it out to the ribbing length that I like, pick up the live stitches to knit on wards to make a really quick hat - no cast on, no ribbing, but hand-knit (well partially).

The yarn is a bit Green (with a capital G) so I may tone it down a bit by throwing it into the dye pot for an experiment.  But it is worth rescuing this yarn for it's fiber content - 40% Merino Wool, 30% Viscose, 20% Angora + 10% Cashmere - good stuff!

Monday, March 9, 2015

...and now for something completely different


I purchased three skeins of undyed/natural wool to mess around with and to try something completely different for me.  I dyed these with Easter egg dye.  It was a total experiment and turned out pretty cool (if I say so myself and now I can check that off my list of dye techniques to try).

All of the wool was pre-mordant with Alum & CoT  and was still a bit wet. 

For the green/blue: I skeined the wool into a cake and put the blue dye into a bowl then placed the cake of wool in.   It instantly soaked up all of the blue dye so I put a bit more water in and pressed down on the cake to act like a sponge to soak up more.  I let it sit for a few minutes then flipped it over and did the exact same thing with the green dye.  When it was done absorbing as much dye as it could....I should have squished it a bit more to sponge up more of the green as I have some white spots.....I put it in the microwave for a minute 3x...I was afraid of heating the wool too much and doing who knows what to it, so I only did one minute intervals.  

Some in progress pics:

Skeins in cakes & the dye


 the vibrant dye...ready to go


the blue dye


...and the green half


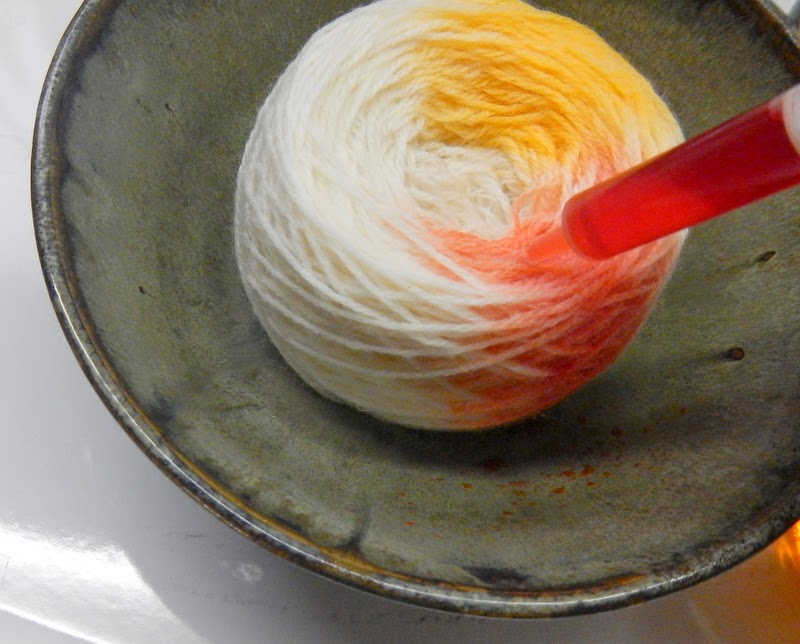
The red/yellow/orange/purple skein was caked and placed in a bowl then I   used a syringe and squeezed red/yellow/orange into segments with the purple being in the middle.  I pushed on the cake like a sponge again to have it absorb as much dye as possible...it also went in to the microwave the same as the other skein.  

In progress pic:  

I didn't take any other shots of this skein being dyed...not sure why?  but as you can see I sectioned each color into segments and sometimes forced the syringe into the caked wool to get the color into the inner layers.  The middle was injected with purple.


...and the last one was on a total whim...I snow dyed this skein.  Yep, SNOW!  I put the skein on a window screen suspended over our basement sink which had a basin in it to catch the draining dye.  Then I went outside and scooped up snow to toss on top on the yarn, which I then poured the dye over this.  Over time the snow melts and the dye runs over the yarn and drips out into the basin....so it can happen slowly then happen fast so the colors are much more muted with a tie-dyed effect.

In progress pics:

The yarn spread out on the screen


the snow dumped over the yarn


the dye poured all over the snow


So from that < to this > was pretty fun and interesting!

Thanks for stopping by!

Monday, February 23, 2015

Dyeing with Marigolds

I had some extra time on my hands being stuck inside with freezing temps and snow so I decided to dye some wool.  I purchased a sweater at a thrift store with the intent of reclaiming the wool to dye.  The content is 70% lambswool, 20% angora rabbit hair and 10% nylon, but it was a shade of blue I'm not too fond of so I grabbed a bag of frozen Marigold flowers I had from two Summers ago and got busy. 

11.59 oz of frozen Marigold flowers (weighed prior to being frozen) -- My wool weighed around 11 oz

poured (almost) boiling water to steep and mashed with a potato masher to extract color


the Marigold dye


......and the end result.  

I followed the usual dye technique for dyeing with Natural Dyes (scour, mordant & dye).  

I put a piece of the before sweater fabric to show the contrast in color.  It is interesting to note that you obtain different hues when dyeing fresh vs dried Marigold.  As one would expect you get lighter vs darker tones.

Now to pick a knitting pattern.......


Thursday, January 22, 2015

Natural Dye Series #5 - Black Beans

 This is probably one of the simplest ways to dye yarn and fabric.   Get a large bag of dried black beans, find a recipe for black bean soup (because you will probably want to eat them after they soak), place the dried beans in a large bowl and cover with water.  Soak overnight.  Add more water if necessary. 

In the Morning, drain the liquid.


The bean are ready to be cooked into that recipe.  May I suggest this one.  Easy and delicious.


Place your yarn into the liquid you drained from the beans.  I used unmordanted unknown wool yarn that I found in my local thrift store on a big giant cone.  It is super rustic and scratchy, but perfect for little dyeing experiments.  I've been making a few different naturally dyed colors and am planning to knit a cowl.


I placed this is a sealed jar and put it in the fridge for about a week.  I stirred and check it every once in a while, but I left it alone.  It got kind of stinky so I'm glad I put it in the fridge.  I was afraid of mold.


Here it is...nice and greyish blue.  The yarn on the left was dyed previously and blogged about here.  I heated the black bean mixture which you shouldn't do unless you want a murky brown.


Here is another go with black beans....

I knit the Meadowsweet Shawl.  Out of JaggerSpun Zephyr Wool-Silk blend in the daffodil colorway.  I'm not much of a yellow type person so I thought I'd try and dye it with black beans.  
Yellow + Blue = Green!


I put the knit shawl in the black bean liquid.


I was a bit concerned during the soaking (which was about 3-4 days at room temp) that the color was a tad bland and not very vibrant, so I pulled the shawl out and stirred a few tablespoons (about 2-3) of baking soda in the liquid.  After this dissolved, I returned the shawl.  It soaked for additional day. 


The after.....


and all three black bean dyed items together for your reference.


Thursday, September 4, 2014

Natural Dye Series - Part 3, Tea & Mint


Tea isn't anything new or different, most people know it dyes with a nice 'antiqued' look.  My husband and I drink a lot of tea so over a few weeks, I collected all of our used tea bags in a large ziploc bag.  I kept this in the fridge since I was afraid of mold.  There was over 50 tea bags ranging from Green Tea to Earl Grey to English Breakfast (all Twinings if you are interested).  

Here is how the dye took on the skein.  Kind of bland and boring if you ask me.


In addition to the yarn I dyed a plain white skirt that has been lurking in my closet for years.


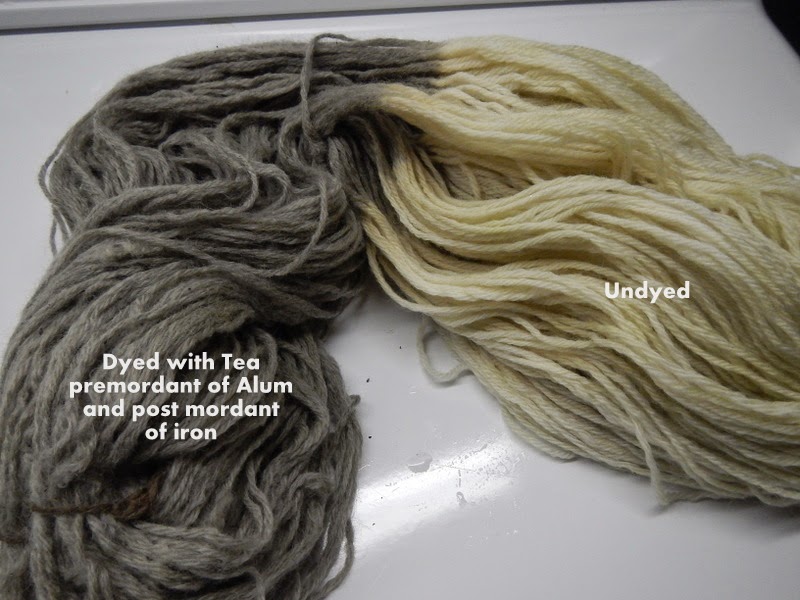
As I mentioned above, I thought everything was bland and boring so I decided to give each a dunk in an Iron Post-Mordant.  My Iron Mordant is some old metal stuff the kids found in the yard while they were digging.  I put this in an old jar with some vinegar and water.  It sat for weeks until it was a murky orangey color.  I added about 1/2 cup of this into some water for the Post-Mordant. 


Each went in for a few minutes....probably 10-20 in total.


I only placed the part of the skein that was originally dyed with tea, not the whole skein.  The remainder of this skein was dyed with some mint (see below).


It darkened the skirt at bit...it is linen.


And the wool a lot.


Next, I put some fresh mint from my garden into the pot for the other half of the skein.


Here is the yarn in the dye pot with the mint tea.


It is a nice golden yellow, but I wondered what it would look like with an Iron Post-Mordant.


So in it went.  I only did half of the half dyed with mint.  I held it in the Iron bath for a few minutes checking it ever once in a while until it was a darker color.


and the final result


and what I've been knitting with the yarn...Splitbark Mitts by Stephen West


Now I figured, since this is technically a soap blog...here are a few snaps of soap where I used mint or tea as a natural dye.


Next up in the Natural Dye Series is Black Eyed Susans and Coreopsis (Verticillata to be specific) and unfortunately (or fortunately depending on your interests) this next series is only involving yarn...no soap.