

Sunday, March 29, 2015
Friday, March 27, 2015

Tuesday, March 17, 2015


Monday, March 16, 2015
FINISHED that WIP....
Did you look at my last post and wonder what those bundles were around a stick?
Here's what I made from it..............


I Eco-dyed fabric to make some drawstring bags.
Just an idea I had to package something new that Dusty Tree Soap will be featuring this Season at our local farmer's market.
Watch this space......
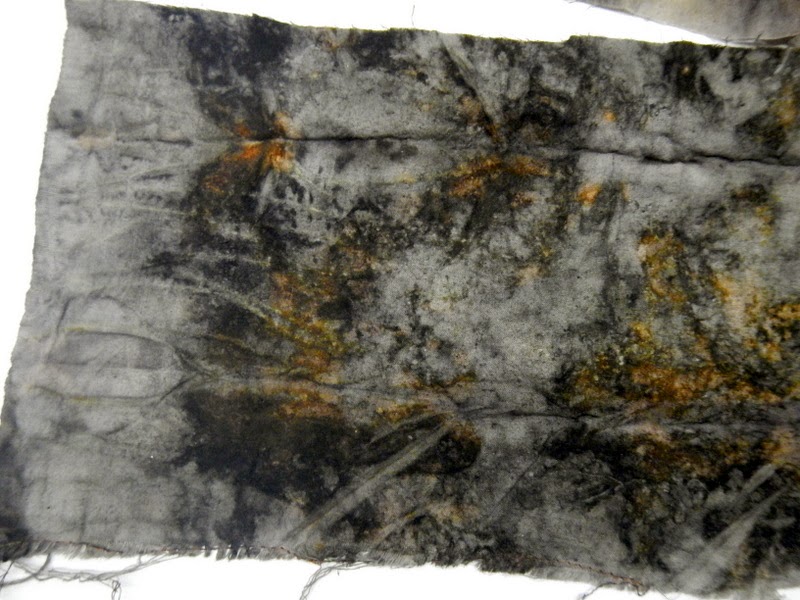
So how in the world did I do that?
I purchased a yard of plain muslin...washed/dried it and cut 5 stripes using my elaborate template of an old piece of paper. My template is 7"wide x 291/2" long.

I gathered my supplies.....
some dried herbs/flowers from my garden, steel wool, vinegar & tea

I enlisted the help of my 3 year old son to help work the magic....he really did all the work, I just directed him. We make pizzas together so I told him to sprinkle it on like you do the cheese on pizza. I put the steel wool in a container with some vinegar to soak to start it rusting.
(I put this on the fabric...my son did everything else)

After you cover it as much (or as little) as you prefer, top it with another piece of fabric and roll it around a stick. I secured it with some wire I had on hand.


then steam them for a bit..........

and voila....eco dyed fabric. The fabric panels actually turned out better than I expected. I thought they would be somewhat pale so I was pleasantly surprised with them.
I used this tutorial to make my bags.

If you like DTS already on Facebook,
then you've seen these, but some of my newest soaps for Market.
The classics........


Thanks for stopping by!
Friday, March 13, 2015
a work in progress.......
Fabric,
little bits borrowed from Mother Nature,
some steam
and a little industrial wire

Spring will push through soon

rust & eco dye......

eerie and fantastic.......

simply delightful......
Wednesday, March 11, 2015
SoAp...YES soap!
With Market (quickly) approaching, I set out to make some soap.
During the Winter I cleaned and organized my work-space and I must admit I'm a bit more efficient when things are scattered everywhere in a big mess....almost like it is a bit of an inspiration to be 'IN THE MESS'. With everything put away all proper, I wasn't sure what 'type' or design I wanted to make. I knew I wanted to use: Cinnamon, Mint and Moroccan Red Clay, but I wasn't sure what I wanted my design to be so I turned to the internet.
I did a quick Google search and found this inspiring.......

To me I see colorful stripes with green and orange accented with some brown. I have to admit it is a bit hard to get a true orange in naturally dyed cold processed soap but I knew my Moroccan Red Clay would give me somewhat similar results.
so I made this.......
Moroccan Spring

A quick run-down of my process......
divided my batch into thirds and added my natural colorants

and started layering.....

and layering.....

and layering until all the soap was gone!

It is nice to be back in the soaping seat again...look out for more bubbly goodness in the weeks ahead. Thanks for stopping by!
Monday, March 9, 2015
...and now for something completely different

I purchased three skeins of undyed/natural wool to mess around with and to try something completely different for me. I dyed these with Easter egg dye. It was a total experiment and turned out pretty cool (if I say so myself and now I can check that off my list of dye techniques to try).
All of the wool was pre-mordant with Alum & CoT and was still a bit wet.
For the green/blue: I skeined the wool into a cake and put the blue dye into a bowl then placed the cake of wool in. It instantly soaked up all of the blue dye so I put a bit more water in and pressed down on the cake to act like a sponge to soak up more. I let it sit for a few minutes then flipped it over and did the exact same thing with the green dye. When it was done absorbing as much dye as it could....I should have squished it a bit more to sponge up more of the green as I have some white spots.....I put it in the microwave for a minute 3x...I was afraid of heating the wool too much and doing who knows what to it, so I only did one minute intervals.
Some in progress pics:
Skeins in cakes & the dye

the vibrant dye...ready to go

the blue dye

...and the green half

The red/yellow/orange/purple skein was caked and placed in a bowl then I used a syringe and squeezed red/yellow/orange into segments with the purple being in the middle. I pushed on the cake like a sponge again to have it absorb as much dye as possible...it also went in to the microwave the same as the other skein.
In progress pic:
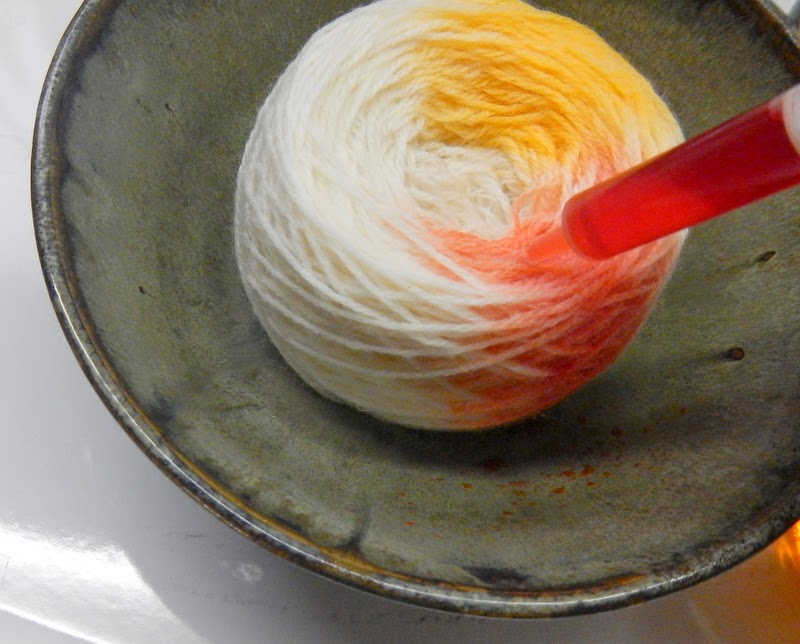
I didn't take any other shots of this skein being dyed...not sure why? but as you can see I sectioned each color into segments and sometimes forced the syringe into the caked wool to get the color into the inner layers. The middle was injected with purple.
...and the last one was on a total whim...I snow dyed this skein. Yep, SNOW! I put the skein on a window screen suspended over our basement sink which had a basin in it to catch the draining dye. Then I went outside and scooped up snow to toss on top on the yarn, which I then poured the dye over this. Over time the snow melts and the dye runs over the yarn and drips out into the basin....so it can happen slowly then happen fast so the colors are much more muted with a tie-dyed effect.
In progress pics:
The yarn spread out on the screen

the snow dumped over the yarn

the dye poured all over the snow


 So from that < to this > was pretty fun and interesting!
Thanks for stopping by!
Subscribe to:
Comments (Atom)